This entry is part of the Maximo Java Development series.
A typical need during Maximo application customization is the ability to display a message on the GUI.
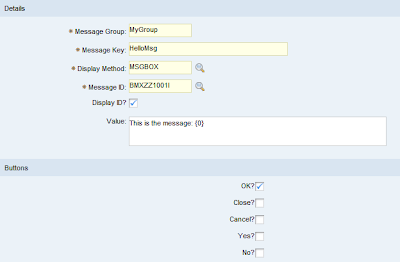
The first step is to define the custom message. Open the Database Configuration application and select Messages for the Action menu. Create a new entry filling the required info:
- Message Group: Messages can be categorized in groups. I typically put here the name of
the customer that I'm working on. This allows to quickly list all the
custom entries.
- Message Key: Unique ID of the message. This field together with the MSGGROUP uniquely
identifies the message. I typically use a short descriptive name of the
message like 'InfoMsg' or 'ErrorMsg'.
- Display Method: Can be 'MSGBOX' or 'STATUS'. The 'MSGBOX' display a standard popup
window displaying the message and a set of customizable buttons. The
'STATUS' displays the text above the tool bar and does not require user
intervention.
- Message ID: Unique ID of the message. The typical format of custom messages is
BMX[CC][NNNN][T] where [CC] is a two letters code that identifies your
customization, [NNNN] is a four digits number and [T] is the type of
message and can be E (Error), W (warning) or I (Info). Maximo suggest to use [CC]='ZZ' for custom messages. For example I
have started my custom enumeration with code BMXZZ1001I.
- Value: Text that will be displayed. Use {N} tags for parameters to be replaced
at runtime (see example hereafter). Use \n to insert a newline.
Here is a screenshot of the new message.

Now that you have defined your message in the database it's time to show it.
The technique to display the message is different whether you are in an AppBean or in a Mbo class.
AppBean
If you are in a custom application bean class (extending AppBean) those two Java lines will bring up the custom message box.
String params[] ={"Hi there!"};
clientSession.showMessageBox(
  clientSession.getCurrentEvent(), "MyGroup", "HelloMsg", params);
As you can see the {0} tag in the message will be replaced with the string 'Bruno' defined in the params array. Obviously it is possible to define multiple tags.
It is also possible to display this message box when an exception is thrown. For example the following two rows will display the same message but will also log a stacktrace in the system logs.
String params[] ={"Hi there!"};
throw new MXApplicationException("MyGroup", "HelloMsg", params);
Mbo/MboSet
If you are in an Mbo or MboSet (businessobject project) you can 'attach' the message to the MboSet with the MboSet.addWarning(MXException e) method.
String params[] ={"Hi there!"};
this.addWarning(new MXApplicationException("MyGroup", "HelloMsg", params));
Alternatively it is possible to throw an MXApplicationException like this.
String[] params = {"Hi there!"};
throw new MXApplicationException("MyGroup", "HelloMsg", params);
Labels: advanced, application, custom, java, maximo
